Flow
Flow
TriniTuner.com  |  Latest Event:  

Forums

Project S14.5 Spec R, Part II VE-T In the Making Page 26!!!

Automotive Non-Technical topics... Just anything car related for the gear head in all of us

Moderator: 3ne2nr Mods

User avatar
Maserati
Trying to catch PATCH AND VEGA
Posts: 6867
Joined: May 26th, 2003, 12:35 am
Location: up d road
Contact:

Postby Maserati » September 6th, 2007, 12:06 pm

nice
I've seen some flat black cars and they looked pretty decent IMHO, made my head turn

User avatar
TriniGT
punchin NOS
Posts: 4293
Joined: May 6th, 2003, 12:22 pm
Location: Home Playing DIYer

Postby TriniGT » September 6th, 2007, 12:12 pm

Why not, better than putting 2K, I had a black car, pressure. Blue is all played out, maybe a white could be a possibility white on white.
Image
Image
Image
Image

I'm afraid to go in some custom colour in the event that somthing were to happen and requires a repaint, no touch up but full paint-over, never get the right mix.

User avatar
Yeo
TunerGod
Posts: 26422
Joined: May 12th, 2003, 7:36 pm
Location: Far Rockaway, NY
Contact:

Postby Yeo » September 6th, 2007, 12:23 pm

Champagne hoss... a beige metallic clearcoat.

User avatar
TriniGT
punchin NOS
Posts: 4293
Joined: May 6th, 2003, 12:22 pm
Location: Home Playing DIYer

Postby TriniGT » September 6th, 2007, 12:29 pm

Finally when this project is done then I can say I have actually seen a project come to completion. The primera was an ongoing project, but this is really off the end for me at least. Jumping into something like an RB26DETT where I have had no experience with it unlike knowing somethings on the SR and doing a full S-chassis conversion from an S14 to an S15 is a real challenge but I have my daily driver so why not take the time and try it. What's the worst that could happen, it look shitty???? Ah well I will have to live with it. I just wanna see it to the prepping and primer stage where all the lines are running seemlessly from the tailight panel to the front fenders and then I will know for sure how it will come out.

Look at the lines on the side, that is what needs to be replicated. I have half of the trunk area, from tailight panel to half up the trunk.
Image

User avatar
TriniGT
punchin NOS
Posts: 4293
Joined: May 6th, 2003, 12:22 pm
Location: Home Playing DIYer

Postby TriniGT » September 6th, 2007, 12:32 pm

Yeo lehme see some pics. Right now I just concentrating on the body, when that done I go look at paint.

User avatar
Dragsta
punchin NOS
Posts: 3336
Joined: November 6th, 2006, 7:51 pm
Location: central

Postby Dragsta » September 6th, 2007, 12:46 pm

ohhhh mmyyy ggggooooddd

it's Something abt that white :P

User avatar
skyline dett
3NE 2NR for life
Posts: 155
Joined: February 3rd, 2007, 1:29 pm
Location: HITING 180 IN MY 180

Postby skyline dett » September 7th, 2007, 10:39 am

TriniGT, when you don this car go be real mad cause it looking good so far

bump

User avatar
redras
30 pounds of Boost
Posts: 2649
Joined: September 24th, 2003, 3:39 pm
Location: Round d straight corner

Postby redras » September 7th, 2007, 8:02 pm

Project coming along good Jason, can't wait to see the finished monster...
And yes ah want ah lil small drive when yuh done :mrgreen: :mrgreen:

User avatar
TriniGT
punchin NOS
Posts: 4293
Joined: May 6th, 2003, 12:22 pm
Location: Home Playing DIYer

Postby TriniGT » November 19th, 2007, 1:32 pm

Well it's been a while, car is still in the shop, the conversion is coming along nicely, the back is all done as is the sides. I opted to get some other parts to make the conversion a little easier but nevertheless the back and sides are done, the front is currently being worked on, the colour is still up in the air but I think I am still sticking with the flat black look. Rear fenders will also be getting some much needed flaring to take some nice offset and wider wheels. I am hoping that the car should be done in a month or so but things always crop up, like me needing a windscreen for the front.

Another plan has changed for now at least. The RB26DETT is taking a lot of money and I have decided to give myself more time to build it, I don't wanna rush it so here is the plan. I have recently picked up a damaged S15 SR20DET head and block and have already sent the block to sleeve. I am going to be putting all the parts I had for my S15 into this one instead, my S15 engine works fine and I don't wanna change that. So the donor engine is going to get the entire shebang and be put into the S14.5 for now until the RB26DETT is done. This worked out nicely so that I can get the car up and running soon after the car comes out of the shop. So here is the new parts list for the SR20DET,

Wiseco 86.5mm pistons - using this bore in the event that something happens we can still rebore.
Pauter Rods
ACL Race Bearings
Greddy Sump
Brian Crower Stage 3 Cams
Brian Crower Springs and Titanium Retainers
MBV Solid Lifters with custom shims
Fully ported and polished headwork
All Casting marks removed and rough areas of the head and block smoothened
SARD Fuel Regulator
850CC Injectors, may need bigger
Splitfire Coilpacks
Greddy T04 Equal Length Twin-Scroll Manifold
HKS TA45S Twin-Scroll Turbo
Greddy 47mm Wastegate
Greddy Intake Manifold
Hondata Intake Manifold Gasket
Ported lower runners to match the head and also to match the greddy manifold
Custom 3.5" Downpipe to 4" Exhaust
Apexi 3.5/3.75/4" Exhaust
Management is unknown as I was not planning this build, I have an Apexi Power FC for my current S15 I may contemplate using it initially and then get an AEM or Haltech/Motec
Regular other stuff are:
Aftermarket ARC GTR Intercooler
3" Intercooler piping
Trust Oil Cooler with braided lines
Samco Hoses
Flexalite Fans
Koyo Radiator
Defi Interior Gauges
Custom Instrument Panel
Recaro Seats
Custom Interior Fabric
7pt Cusco Roll Cage
Twin Walbros and maybe some sort of fuel cell, not too sure as I want to keep it as streetable as possible
Cusco Coilovers
SPL Adjustable front lower Control Arms
Megan Racing Adjustable Tension Rods
Megan Racing Adjustable Traction Bars
Megan Racing C-Pillar
Megan Racing Ends
Cusco Strut Tower Bar
Cusco Under-carriage Bar
Custom 13" Rotors with four-pot Calipers in the fornt, R33 brakes in the back complete with emergency brake conversion
Usign stock driveshaft for now but when the RB goes in a custom one-piece driveshaft is waiting.

I am sure there are some things missing but just wanted to give you'll an idea of what is going on as some of you'll wanted to know if I had scrapped the project. When the car comes out of the shop pics will follow so don't worry.
Last edited by TriniGT on November 19th, 2007, 1:37 pm, edited 1 time in total.

User avatar
Maserati
Trying to catch PATCH AND VEGA
Posts: 6867
Joined: May 26th, 2003, 12:35 am
Location: up d road
Contact:

Postby Maserati » November 19th, 2007, 1:35 pm

jeeze impressive
good 2 see u doing a good and carefull build
all the best
looking foward to the pics. when she is out of the shop

lowlife

Postby lowlife » November 19th, 2007, 1:54 pm

you have me missin my last project......very impressive though. Can't wait to see this when it's finished.

User avatar
TriniGT
punchin NOS
Posts: 4293
Joined: May 6th, 2003, 12:22 pm
Location: Home Playing DIYer

Postby TriniGT » December 10th, 2007, 1:23 pm

Alright I went by the straightener, update, the front has been worked on, all that needs done now is to attach the S15 nose cut and more importantly GET A FRIGGIN S15 WINDSCREEN!!!! to mock up on the car and check for any alignment issues and then adjust and ensure that the windscreen is flat on the car then remove and finish stitch welding the chassis. I am contemplating removing the stock fuel tank and making an aluminum fuel cell but I have still to be persuaded.

I have already started stocking on braided lines to upgrade the fuel and braking for the rear and I am at the moment trying to sort my front and rear brake upgrade. The front being more complex as the caliper and rotors setup I have is unknown but is huge, 13" rotors and a mofo caliper that will more than likely need some sort of bracket to work on the stock spindles. Suspension is eagerly awaiting installation, cusco coilovers and an assortment of Megan and SPL adjustable pieces to get the car exactly where I want it for drag and then maybe for drift sometime in the future. I hope I don't disappoint the anticipation but I would think in the near future I will have some primered shots of the car with the URAS Monkey-Magic Kit.

I am picking up the Blitz Intercooler and Recaros for the car today, much thanks will be in order for all those that contributed in some way, form or fashion for this almost three year in-the-making project. As I said before, once the car is home then it's christmas time as I will be throwing on all the parts I had in hiding. Still need to order SPL RUCAs and SPL RLCAs, other than that everything else for suspension is in. Pistons are in transit and rods are to be ordered still (Pauter). Once the rods come in then I will sort the clearance issues for the crank and mains and order the right grade bearings from tomei or nismo as they are some of the few that sell different grade bearings. This is all for the SR head if people didn't know the RB project is on standby until major funds are in so the SR engine will be quickly sorted and built and ready to run in no time. Hopefully by first quarter the RB will be done and swapped over and the S15 built motor will be finding a new home, maybe in an other project donor or my S15 if I still have it :mrgreen: .

I am going to be either ordering a roll cage if money allows or have it made locally, Cusco most probably. As for the interior, I have come up with a plan for the gauges, no dash mounted gauges but having the gauges being motorized from the Air Bag dash unit. I am going to have the air bag unit stripped to only have the cover and get a housing fabbed up and motorized so that when the key is switched to accessory it will flip the airbag dash unit up and display the three Defi Gauges, yeah some bling for the sting. I want the car to be one of a kind so gonna add some small touches to it. The instrument panel is going to be entirely custom, was hoping for full Defi but getting the gauges and in the right sizes is proving to be difficult. I may have to opt to using my first idea and using an Autometer RPM and Speedometer setup and an AEM Wideband on one side and an Autometer Fuel on the other side. We'll see as time progresses. Will be going for the Defi Informeter as well merely for some bling as well.

The entire interior is going to be fitted with Bride fabric, all the door panels, seats will be recaros but everything else Bride, if I come across a nice set of Brides they will go in for sure, but the backseats and everything else will be full bride. The mats, and steering as well will be Bride and I will be using a swing type steering release setup from Works Bell. More updates to follow, hoping for pics soon as well once primer is on.

User avatar
TriniGT
punchin NOS
Posts: 4293
Joined: May 6th, 2003, 12:22 pm
Location: Home Playing DIYer

Postby TriniGT » January 8th, 2008, 10:40 am

So still waiting on the windscreen to come in so in the mean time I am concentrating on my SR build which is going pretty good actually. The head is almost done it's port and polish via the DIY process with a Dremel and the casting marks from the inside of the head walls are all being removed. After that I am going to reseat the stock valves and install the BC springs and Titanium retainers. Same time I will also install the MBV solid lifters and then install the BC Stage 3 Camshafts and check cam lobe to rocker clearances to ensure that it is spot on to eliminate the annoying valvetrain noises. Clearances and cleanliness are key for this install, custom shims are used to get the proper clearances on the lobe/rocker setup. That should be most of the headwork, Tomei Cam gears are still on order.

After that the Hondata intake manifold gasket will be put on to reduce vibration and temp levels to the intake manifold and hence increase the density of the air entering the combustion chamber and in turn the mixture. The Greddy Intake manifold will then be attached and the Q45 throttle bolted on, using the Q45 throttle because it is a known upgrade for the SR RWDs as their throttle is tiny and also known for losing screws to the intake and damaging parts. Q45 throttle screws will be loctited as well for peace of mind.

The head has already been sleeved and I just picked up the CP pistons 86.5mm bore with custom high HP race rings that will too need skimming to the appropriate clearance. Sanctifier has enlightened me on the honing/boring process and on further research realized that I will need to use a torque plate to get the honing process done correctly. I am in the process of getting an old SR head that will be bored at the valve to allow the honing setup to pass. The head will then be put on the block and torqued to spec and then bored/honed accordingly, this is done because most people locally that bore a block would take the block and simply bore it and when the head is then put on and torqued the piston-to-wall clearances change as the block tends to slightly pull in the center of the cylinder making it a concave shaped, so boring with a torque plate allows the block walls to be bored properly, enough of the explanation.

Custom Cosworth bearings will be ordered along with the Pauter rods and the block will be then built, actually very easy to put together, afterwich the Greddy Sump will be put on, used this sump because it is baffled and takes an extra quart which is always good when cornering hard. The entire engine will be put together with a new gasket kit as well. After the engine and block have been built then I will sandwich them using ARP head bolts and an Apexi Headgasket, Cometic is sheit!!! For the main bolts I will be using GTiR main bolts. I am currently trying to see if Mazworx can help with my block work to adapt the 19mm bearings from on the GTiR to be used on the RWD block, we'll see as it is very costly for me to send my block up there to be worked on.

Once all that is done then I will bolt on the Greddy Exhaust Manifold along with the HKS T45AS Turbo and also put on the 850CC injectors and that should be most everything for the engine.

As for the car I have finally decided on the colour scheme and it is Flat Black and army green (flat as well of course) along with bling chrome for the engine bay. So my interior will be a combination of these as well as the exterior. I just need to get the colour code for the army green and start to coating the calipers in engine bay interior pieces in it. Intake manifold will also be either chromed or put in wrinkle black. Will update as things progress.

User avatar
pornstar4777
Trinituner Peong
Posts: 499
Joined: May 29th, 2003, 12:40 am
Location: where the wind blows

Postby pornstar4777 » January 8th, 2008, 10:49 am

:twisted:

lowlife

Postby lowlife » January 8th, 2008, 1:55 pm

ting soundin monstrous :twisted: :twisted:

User avatar
wraith
Trinituner Peong
Posts: 424
Joined: February 10th, 2005, 3:54 pm
Location: Grenada
Contact:

Postby wraith » January 8th, 2008, 2:18 pm

sounds like it is going to be a beast, would love to see it when finished.

btw what body kit are you using?

User avatar
TriniGT
punchin NOS
Posts: 4293
Joined: May 6th, 2003, 12:22 pm
Location: Home Playing DIYer

Postby TriniGT » February 11th, 2008, 10:42 am

Ah finally a small breakthrough, all credit goes to meh boy Dry. I finally got a damaged windscreen that could at least be used to mock-up on the car to complete all welding and aligning. I finally got my last shipment in for 99% of the S15 interior. Why I brought them in, well let's just say getting anything locally for an S15 at a good price is not possible. I got everything shipped in from a combination of places at a quarter of the local cost. I have a full S15 interior, dash, center console, seats, back seat, all plastics. May not sound like much but I am very excited to have gotten the front mock-up glass, this was the last piece for the car.

Now that the car can be completed and have everything welded and then have the interior and the front of the car stitched as well and then all put together and the kit fitted. At least in the waiting process I picked up some things to help with the process, I acquired front widebody fenders vented as well, now just need to get the back or if need be I will roll the fenders or most probably do some custom metal work on the fenders and have them flared but that will only be done when I find the right wheels for the car so that it can be spot on and fit flush.

Once the car is all lined up then I will bring the car home and have my good friend come and stitch weld the car and then hopefully by then have the SR fully built and then just drop it in and start the mocking up of the RB25DET box on the SR engine, yes I wanna do it right first time, don't want no broken gears. Plan is to make a jig for the car and also for the box and put it in place underneath the car and from there use a mock-up RWD engine and see how the engine lines up. I don't want to shift the stock location of where the shifter comes into the cabin, so I will work from the cabin and move forward to the engine bay. I'M STOKED, can't wait for the car to come home for a visit!!! Pics will follow.

User avatar
TriniGT
punchin NOS
Posts: 4293
Joined: May 6th, 2003, 12:22 pm
Location: Home Playing DIYer

Postby TriniGT » February 11th, 2008, 11:07 am

wraith wrote:btw what body kit are you using?
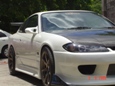

Exterior:
Monkey Magic Front Bumper
URAS Sides and Rear Kit
JDM Widebody Front Fenders
Most probably Custom Widened Rear Fenders (Full Metal)
Nismo CF Vented Bonnet (Four Vents)
Ganador Mirrors
DRFT Tailights
For now GTR Wheels, someone bought my set of Rays dish wheels by D&D, grrrrrrrr .............. you know who you are. I may think about the Nismos but that may be in the works when cash is available, I may just get the Rota GTRs in the 18's but I really want 11" in the back and 10" in the front.
I am going to mock up and see if the GTR Rear Spoiler matches the URAS kit if so it will stay if not then I will order a CF rear spoiler
Still looking to order a CF Trunklid

Interior:
Custom Bride Interior, all door panels and seats
Defi Gauges - Boost, Oil Temp, Water Temp, EGT
Nismo Instrument Cluster
B&M Short Throw Shifter
Takata Harnesses
Roll Cage
C-Bar
Full S15 Interior

Trunk:
Full Fuel Setup not sure as yet but it will incorporate a fuel cell, swirl pot setup and new braided lines and fittings, I don't want to have any fuel issues.

Engine Bay:
For now it will have to be a built SR capable of 400+HP runs but ultimately it will have an RB26DETT/T setup capable of handling 600HP and very streetable. That's all I can say on the setup for now until everything is finalized.

Suspension:
Megan Racing Front Tension Rods
Megan Racing End links - TSC
Megan Racing Under bar/ Drag Bar - TSC
Megan Racing Traction Bars - TSC
SPL Front Lower Control Arms
Still to be ordered are the Cusco Rear Upper Control Arms and the SPL Rear Lower Control Arms
Either Cusco Coilovers or the HKS Hypermax Coilovers, both I have but will try between both and see what works better.
Front and Rear Whiteline Stabalizer Bars

User avatar
Tsuchiya
3NE 2NR Moderator
Posts: 1583
Joined: April 24th, 2004, 8:42 pm
Location: the Drift Kid....
Contact:

Postby Tsuchiya » February 11th, 2008, 2:03 pm

hope u logging that build every step of the way with a camera.
That build soundin like stuff to tell your grandchildren about...tha great trini s14.5 pioneer :lol:

User avatar
TriniGT
punchin NOS
Posts: 4293
Joined: May 6th, 2003, 12:22 pm
Location: Home Playing DIYer

Postby TriniGT » February 11th, 2008, 2:28 pm

Yeah right I just trying like everyone else, some tried and tested stuff and something different all in one. Finally I am seeing the light at the end of the tunnel for the shop work. Once completed then it is up to me for the engine and suspension work and then up to the tuner and myself for the power goal. Once the suspension is installed I wanna begin to learn how to set it for the different applications too :mrgreen:

User avatar
Conrad
punchin NOS
Posts: 4126
Joined: June 15th, 2006, 7:38 am
Location: 3NE2NR

Postby Conrad » March 16th, 2008, 4:55 pm

Updates? Absolutely love this build.

User avatar
TriniGT
punchin NOS
Posts: 4293
Joined: May 6th, 2003, 12:22 pm
Location: Home Playing DIYer

Postby TriniGT » March 17th, 2008, 7:43 am

Well as usual still waiting on Double Zee to bring in my windscreen. Should be here soon. Car is having the old radiator panel removed and the S15 panel put on currently and then having the wide front fenders put on and the vented bonnet all fitted to see how best everything lines up. Then minor adjustments will be made to the front and the front bumper and headlights fitted and then the entire body will be stripped and the car sent to be stitched welded. After being stitched the mockup of the engine will be done to see how the fitment is, may for now use an SR to get the car running but ultimately the RB26DET/TT (not decided on yet) is the goal. If money permits I will be putting twin 3076Rs, I want some response and I may go all out on this setup but time will tell as I am dropping a project this year as my friend has a lot of interest in the AWD B13 that I had in the making so he may take that over and I will concentrate on this fully. Later on down the road the 1600 may still have a home with me.

When the stitching and fitment is sorted it's back to the primer booth and then finally my satin black paintjob.

User avatar
TriniGT
punchin NOS
Posts: 4293
Joined: May 6th, 2003, 12:22 pm
Location: Home Playing DIYer

Postby TriniGT » June 18th, 2008, 8:38 am

Well as some of you know my plans have changed a little, I am for now building a 500+HP capable SR20DET to get the chassis up and running, engine will either be sold after or swapped into the daily and then whenever the RB build is complete that will be swapped into this project car. Soemthings are taking a bit longer but with good reason, the car is still at the bodyshop undergoing some minor adjustments as the bodykit is being installed, the front bumper is a URAS but seems to be a widebody bumper that I got that was damaged in some drifting and although repaired seems to be very hard to get aligned properly without some cutting. I am at this point thinking about bringing in a next already made URAS copy front bumper but I am giving the balance of the week to see how things turn out. The sides and the back seem to be an easier fix as with all bodykits there is some minor bugs that need working out.

The fibreglass vented bonnet is already installed along with the widebody front fenders that I located locally. I am going to be taking the rear wheeels over to the shop to see what clearance issues there are and flare the back fenders if needed. I am now needing to remove the R32 diff and axles and brake setup to get it installed on the car but therein lies the problem, everytime I try to slacken the hub nut it the diff spins so I need to get something to lock the diff to break the hub nut free. I have already ordered the R33 handbrake cables so those are on the way. I also ordered one for my S15 so when it gets in I will upgrade the rears one time.

The planned Nismo instrument Panel made its debut on my S15 upgrades and has 11Km on it now as I am trying to use up the old gas in the S15 after four months of being parked up. So for the project car I will be going with the original plan which was to fabricate a custom gauge setup using Autometer Gauges, one speedo, RPM, Fuel and then an AEM Wideband. The Autometers were had by Brian aka SR20VE. The Defi Gauges will be mounted on the A-pillar and also molded into the AIR BAG dash spacing and also made motorized so that when the accessory voltage is triggered it will pop up, yeah a little bling. Body-wise the car is almost done so this has gotten me excited but the front bumper has dampened the whole project right now. Maybe when I see the sides and the back go on my spirits will have risen. At least I have the S15 to drive now so that should keep me preoccupied. Once everytihng has been test fitted then I can do some minor stitch welding work and tehn mount things again and check fitment and then remove them and begine prepping everything for paint. I still have to chose the Satin Black but it's still early so gonna check around and get something that can give me that sleeper effect. Will keep you'll updated but that's it for now, currently I am concentrating on fixing up the garage for the arrival and for all the work to be done.

User avatar
Conrad
punchin NOS
Posts: 4126
Joined: June 15th, 2006, 7:38 am
Location: 3NE2NR

Postby Conrad » June 18th, 2008, 8:50 am

Nice.

User avatar
robbieg
3NE 2NR for life
Posts: 120
Joined: February 12th, 2007, 1:21 pm
Location: Trinidad

Postby robbieg » August 11th, 2008, 1:43 am

so anything on this cuz?

User avatar
TriniGT
punchin NOS
Posts: 4293
Joined: May 6th, 2003, 12:22 pm
Location: Home Playing DIYer

Postby TriniGT » August 11th, 2008, 8:52 am

Car is coming home this week for some stitching and believe it or not I may take a stab at painting it. I am going to be stripping the entire car down to bare metal as there are several different colours on the car, the interior may stay the same colour and get an overspray after prepping but the exterior I want to be stripped. After stripping thoroughly I will be epoxy priming the car to protect it from the elements and then looking at small fillering on the car and then doing a couple more coats of primer and then on with the coats of paint and then plenty of clear.

As for the engine I am sending what should hopefully be my last set of cash for the RB internals. After that, I need small things like clutch, injectors and turbos along with a Tomei Baffle with drilled sump. I already have the RB install kit and custom one piece driveshaft and a lot of other parts but I really wanna concentrate on the car so that I can get it done and have the car home to begin installing all the items that have been home waiting and at the same time clear up all the things.

User avatar
robbieg
3NE 2NR for life
Posts: 120
Joined: February 12th, 2007, 1:21 pm
Location: Trinidad

Postby robbieg » August 11th, 2008, 12:26 pm

Well, I home these days (not working) ........ holla i kinda bored too lol
So if you need a hand clearing up, sanding, photo snapper ..... dun know

User avatar
TriniGT
punchin NOS
Posts: 4293
Joined: May 6th, 2003, 12:22 pm
Location: Home Playing DIYer

Postby TriniGT » November 7th, 2008, 2:41 pm

Well after being asked about it I decided to pull this thing back up. I have finished paying for all my internal RB parts and they are on their way. I am hoping by month-end things will be building and the engine done inernal-wise. I am still indecisive as to what turbos to use as it will be a while before the car is done (Thinking twin GT2871R's though). I have already got a link on the injectors and may be going with some Denso 1000CC injectors and using an Apexi Power FC or may go for a new ECU on the market VIPEC out of Australia.

Most of the metal work on the car is done, I am mostly satisfied except for the front work that was done by the previous garage and I have since stripped the entire front and doing some of the stripping of paint and having the entire front rewelded and having the entire car stitched same time and then getting the car blasted and epoxy primered. Right now I am looking for a reasonable person to do the blasting. I am getting people but the price I was quoted was $4000 and then I have to buy media blast and also buy primer, looking at $7-8000, not feasable for me sorry. If all prices are that high I may go the paint stripper way, painful and long hours but cheap and effective. Got my makeshift garage up and the area is semi lit, good for night work and by this weekend it will be equipped with a breaker panel with enough current to run my compressor and grinders and whatnot. May even look at doing the priming and painting myself once the primer looks half decent. Watch this post for updated pics.

The go now may be white with Takata harness green paint scheme, so car will be having green, matted black, chrome and white work all about it. the body will be white, seats either black or Red, takata harnesses, interior will be most probably Bride interior custom done, calipers will be hopefully powder coated matt takata green, engine with be a combination of green, chrome, matt black, and the engine bay white. All the fittings will be stainless steel, with braided or black nylon lines, and metal work will be chromed and all suspension painted Takata green as well along with the rear sub-chassis and front crossmember and arms and whatnot. Right now I am concentrating on having the flooring tweaked to fit the S15 center console and the S15 dashboard. This is gonna be a full road car when done so I brought in the full S15 interior that a friend was scrapping as he was tracking his S15. The rest of the car is still in progress but I am seeing some light and it has got me going again, after selling my S15 it has had me in mixed mode about the project but now that the small shop has been fixed up with a lot of help from a fella tuner it has given me new strength to see this thing through. Let's see what happens.

User avatar
BlueIce
punchin NOS
Posts: 3427
Joined: November 18th, 2003, 9:09 pm
Location: President of CFRA (cane field racing assoc.)
Contact:

Postby BlueIce » November 7th, 2008, 3:01 pm

GT2871R's

i want i want :oops:

User avatar
TriniGT
punchin NOS
Posts: 4293
Joined: May 6th, 2003, 12:22 pm
Location: Home Playing DIYer

Postby TriniGT » November 7th, 2008, 3:18 pm

BlueIce wrote:
GT2871R's

i want i want :oops:


Yep the key to this whole project is relilability and response and streetable and of course a weekend warrior :skurry: .

Advertisement

Return to “The Car Park”

Who is online

Users browsing this forum: No registered users and 5 guests