Ok so this is a better pic showing the schedule 40 pipe and the bends, wanted to keep as close to original (anything that’s changed is either for the better or last resort) so went thru the extra effort instead of using the pipe straight or fabricating and welding the bends

Ok so the DIY works still going on as time will allow, trying to do the body work on the cab areas that would be hard to get to when the cab is placed back on the chassis
Using thick (cant rem the gauge) sheeting for the underneath and panels
Use ARC for the cab mount points

Thinner sheet on the inside, made patches with folds to minimize the amount of welding and welded joints, only welded a few days and rust already setting in with this weather

Anticipaton of rust is why welds and pathes were left ungrounded, so when we ready to cover then the rust would be ground off in the prep work

PS this is oxy/acetylene welding hence the reason for the charred look and burnt metal, MIG is the newer version but I’ve never used that on auto body so I can’t vouch for the heat effects on tin sheet metal


Front still to be worked on


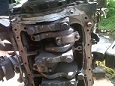
Poor engine beginning to feel forever alone lol

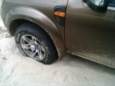
And were back to the chassis, getting ready to flip her over, on her back, with her legs up in the air

Rear assembly taken out, this took half day to get out those shackles due to the rusted bolts and bushings being seized up on them
Pics of the underside:


The white stuff u seeing here is body filler YES the used lots of PASTE on the chassis, I only now get chance to take a pic of it before it get grind off

Check how worn the rotor (tawa) has gotten on one side

More dirt n grease to wash off

Some welding repairs to the front

This rotor looks better, orange lines are sparks from grinder flying, sorry

If you look closely, you can discern the bondo in white from the shiny bare metal parts

Brackets getting braced up and welded off

Underside sections of new area to be put in now

H beam material bracket I mentioned previously

Underside repairs to be done and side welds to be completed


Thickness of pipe stock I forgot to show

Thickness of old crossbrace

Back to CAB
Panel section, welded area, patch and anywhere affected by heat ground down to metal, and being covered with fiberglass body filler, supposed to be stronger, harder n more water resistant than the regular bondo


Overview of flip


Cross section patch, no more paste on chassis,

Previously welded cab areas ground down and surrounded areas also ground to metal, thick hand coated with zinc oxide primer with hardener mixed in, then following day the body guard (black) was applied and left to dry for a few days. This will be base coat of protection to repaired areas


More of work still to be done


Had to put in this light to be able to work till later into the night

If the project busts, this is my backup plan lol. Engine taped off and prepped for power washing, first sprayed purple blaster, let soak and then power wash.


Hand prime filler work, yes, hand prime!!, this is just a coat to stop the weather while can is outside, it will be sanded and final filler and putty will go on then prime back properly with spray gun – main reason for this is that high grade paint thinner is too expensive to be mixing and spraying little areas and using up the thinner to clean back the spray gun each time.