Flow
Flow
Flow
TriniTuner.com  |  Latest Event:  

Forums

Project S14.5 Spec R, Part II VE-T In the Making Page 26!!!

Automotive Non-Technical topics... Just anything car related for the gear head in all of us

Moderator: 3ne2nr Mods

User avatar
Bezman
Trying to catch PATCH AND VEGA
Posts: 6635
Joined: April 24th, 2003, 2:47 pm

Postby Bezman » April 9th, 2010, 10:40 am

well Gormandy's did allot of machine work for me in the past.. thought it was them who ryan sent my head to, ima send ryan a message asking who he would recommend

User avatar
Bezman
Trying to catch PATCH AND VEGA
Posts: 6635
Joined: April 24th, 2003, 2:47 pm

Postby Bezman » April 9th, 2010, 10:46 am

ook, spoke to Pac77 (Ryans right hand man at United Auto) as Ryan is in the US "checking a man about a dog" :wink:


they use Mac Rampersad to do the headwork for everything from customers to the race car

he also recommended Baldwin but said make sure baldwin himself does the work

and of course he stressed check, double check and tripple check everything before during and after ;)

User avatar
Yeo
TunerGod
Posts: 26422
Joined: May 12th, 2003, 7:36 pm
Location: Far Rockaway, NY
Contact:

Postby Yeo » April 9th, 2010, 10:48 am

Wha bout
zigs machine shop.....638-2094.. call and ask.

User avatar
TriniGT
punchin NOS
Posts: 4293
Joined: May 6th, 2003, 12:22 pm
Location: Home Playing DIYer

Postby TriniGT » April 9th, 2010, 10:51 am

Thanks, well I got onto Patrick Balgobin, nice fella and he said he does ineed do the job. I explained what I needed doing and he said it should not be a problem except that he does nto use heat to remove the guides, he has a screw in guide puller that removes the old guide and then he will press in the new guide and ream it to the proper clearances.

I may take both heads down to him to see what he can do, if the price is right I will let him skim the head, give me a 3-angle valve job and maybe butt the valves to the right clearances unless I can get the right thickness shims for the buckets unless he can adjust the shims to make the right clearance. We'll see, he says he will need to see the head and try removing one but he does not see the problem with the job. Will keep you all posted and also, the man says he works 7 days a week, so I down there tomorrow for sure. He is located Coffee Street San Fernando. I am keeping my fingers crossed on this one and once everything works out he is in my favourite numbers.

User avatar
TriniGT
punchin NOS
Posts: 4293
Joined: May 6th, 2003, 12:22 pm
Location: Home Playing DIYer

Postby TriniGT » April 9th, 2010, 10:55 am

Will give Zigs a shout as well, thanks Yeo :wink: .

User avatar
TriniGT
punchin NOS
Posts: 4293
Joined: May 6th, 2003, 12:22 pm
Location: Home Playing DIYer

Postby TriniGT » April 9th, 2010, 11:00 am

Zigs say they do it, they press out the old one and press in the new one. Price is nice but has me worried, they said $20 per guide to press out and in and then I have to get them reamed after to suit. Gonna check Patrick first as he came in highly recommended, we'll see how it goes. Zigs open on Saturday as well from 8-11AM just for reference for the working people that can't get time off :lol:

User avatar
.:PROZAC:..
punchin NOS
Posts: 4195
Joined: May 7th, 2003, 9:58 pm
Location: Mississauga,Ont.

Postby .:PROZAC:.. » April 9th, 2010, 11:13 am

You said on the Coffee there Jason,I wonder if it's teh same old guy that sells the original datusn parts.
Boy I hope local talent like that is passed on to someone.

User avatar
TriniGT
punchin NOS
Posts: 4293
Joined: May 6th, 2003, 12:22 pm
Location: Home Playing DIYer

Postby TriniGT » April 9th, 2010, 11:19 am

Nto sure but the guys speaks like he knows a thing or too.

User avatar
Bezman
Trying to catch PATCH AND VEGA
Posts: 6635
Joined: April 24th, 2003, 2:47 pm

Postby Bezman » April 9th, 2010, 11:19 am

[threadjack] if ya see a set a datsun parts there let me know eh ;) [/threadjack]

User avatar
TriniGT
punchin NOS
Posts: 4293
Joined: May 6th, 2003, 12:22 pm
Location: Home Playing DIYer

Postby TriniGT » April 9th, 2010, 11:24 am

:lol: that is never a problem. Actually there was a guy down penal that had 1200 parts. Just after Bicks penal on the swervy bend, forgot the name of the place but he had door skins, I think an entire radiator panel and some shock mount walling as well, all new and on shelves. Will try and swing by there this weekend for you, oh and the prices were bess. That was when I had the 1600 and was looking around for items.

User avatar
TriniGT
punchin NOS
Posts: 4293
Joined: May 6th, 2003, 12:22 pm
Location: Home Playing DIYer

Postby TriniGT » April 9th, 2010, 12:26 pm

Bezman wrote:ook, spoke to Pac77 (Ryans right hand man at United Auto) as Ryan is in the US "checking a man about a dog" :wink:


they use Mac Rampersad to do the headwork for everything from customers to the race car

he also recommended Baldwin but said make sure baldwin himself does the work

and of course he stressed check, double check and tripple check everything before during and after ;)


Does Mac Rampersad go by the name Mack Rampersad Auto Spares and Accessory Limited 674-8417?

User avatar
.:PROZAC:..
punchin NOS
Posts: 4195
Joined: May 7th, 2003, 9:58 pm
Location: Mississauga,Ont.

Postby .:PROZAC:.. » April 9th, 2010, 2:12 pm

that is never a problem. Actually there was a guy down penal that had 1200 parts. Just after Bicks penal on the swervy bend, forgot the name of the place but he had door skins, I think an entire radiator panel and some shock mount walling as well, all new and on shelves. Will try and swing by there this weekend for you, oh and the prices were bess. That was when I had the 1600 and was looking around for items.


Ghandi's

User avatar
TriniGT
punchin NOS
Posts: 4293
Joined: May 6th, 2003, 12:22 pm
Location: Home Playing DIYer

Postby TriniGT » April 29th, 2010, 10:22 am

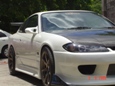
Okay so the project goes on. I have bit the bullet and the entire project has gone full circle. The RB head is off by Patrick Balg0obin having work done, expensive job but he seems knowledgable. The big swing is that the RB ain't going into the silvia no more, I have contemplated this for some time and I have took the plunge and bought an entire S15 front half, starting and working. I bought the front half last week saturday and immediately began the tedious job of scrapping everything. As I began scrapping it I looked at how mint a condition the entire front half is, same time thinking of what was already swapped into the project car. Immediately I began scrapping the S14 removing the dash and all wiring, the butchered harness that was soldered and also the dash bar and whatever else I could have as the front half is immaculate.

In a day I managed to swap over the harnesses inclusive of the engine harness and dash bar and dashboard with air bag, Nismo Instrument Cluster, S15 steering wheel, and full new S15 carpeting. Problem struck then, I was gonna mount the front S15 seats I got and only then realized that the driver seats was screwed, looks as if the car got in an accident and the driver's weight may have twisted the seat. The seat looked to be in a mess, so the first option was to take one of my Recaros with the driver side silvia rail and swap it in. It would be an easy job but I like things to match, and having one Recaro and one normal passenger seat is not my style.

I took the plunge, to where no man has gone before :mrgreen: , it was time to try and repair the twisted seat. I stripped the upholstering on the back rest to a point as there is a part to the middle of the seat that the fabric is hooked and looked at how the backrest is fitted. After some tinkering realised that the backrest had two bolts on either side that held it in place. I made short work of them and had the backrest off, and scrutinized the entire setup to see what was bent, looked at the metal from the backrest and saw that the plate on it was bent. I got a hammer out and straightened that, the other side seemed fine. Now onto the two brackets that attach to the backrest and allows for it to adjust the slant. Both were twisted as well so with the use of a big sledge I was able to tooo straighten them good enough. I then bolted back the backrest and slipped back over the upholstery with some persuasion and checked to see if the fabric lines were aligned with the both the backrest and bottom seating, it was spot on and everything was functionign properly. Seat was then mounted and from the front you could never tell anything was wrong. I then reattached the plastic covers over the bolts holes and installed the Silvia mats :mrgreen: .

Rear seats have not been installed yet as I want to run my power cable for teh battery from the engine bay to the trunk area, once completed I will install the rear seats and have a complete interior. Actually I still need to install the center consolde again but I wanna swap the handbrake setup as the one in the front half is so much better and newer. I am now also debating whether to remove my 4.36 R33 diff and axles and hubs and put in an entire stock Spec R helical setup to match the six speed box and keep the rear 2 pot skyline calipers and rotors. Would have liked to get a 3.9 ratio diff or even an aftermarket 1.5 way LSD setup and swapping it in.

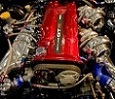
Today hopefully the engine will be out of the front half and then I will add some parts to it namely, Greddy Sump, Greddy Intake Manifold, I may remove the Omori Oil Filter Relocator and install the much neater one I have, install the HKS Hard Pipe intake with filter and my Nismo Engine and Transmission Mounts. Same time I am going to be dropping the gearbox and seeing the condition and type of clutch that is in there, one because I am curious and two because I don't wanna throw it up and then a couple months down the road the clutch gives out. So for now things are progressing and at a decent pace. I have a couple issues to sort out mainly the fueling as the stock hardlines have been cut and I am thinking of running a braided upgrade one time.

User avatar
Conrad
punchin NOS
Posts: 4126
Joined: June 15th, 2006, 7:38 am
Location: 3NE2NR

Postby Conrad » April 29th, 2010, 11:41 am

:shock: :shock: :shock: :shock: :shock:

Kudos, hope it's moving under its own power soon.

User avatar
TriniGT
punchin NOS
Posts: 4293
Joined: May 6th, 2003, 12:22 pm
Location: Home Playing DIYer

Postby TriniGT » April 29th, 2010, 11:46 am

yep has to be by weekend :mrgreen: . Pics to follow of course, will take it on the back strip once the brakes are properly bled and then get the legalities sorted with engine number change and colour change and insurance and then it's my daily. The GTT will be down for the count to get some much needed work done on her and then that is it.

User avatar
Midnight_Demon
punchin NOS
Posts: 3962
Joined: April 9th, 2008, 10:07 am
Location: Riding yuh bumpa
Contact:

Postby Midnight_Demon » April 29th, 2010, 12:20 pm

patiently awaits pics :D

User avatar
wraith
Trinituner Peong
Posts: 424
Joined: February 10th, 2005, 3:54 pm
Location: Grenada
Contact:

Postby wraith » April 29th, 2010, 2:22 pm

wow that is a huge turn around but atleast now the end is in sight.

awaiting the pics. as well.

User avatar
TriniGT
punchin NOS
Posts: 4293
Joined: May 6th, 2003, 12:22 pm
Location: Home Playing DIYer

Postby TriniGT » April 29th, 2010, 2:28 pm

Yeah wraith, nights upon nights I debated it but when I went in bamboo and saw the front half I immediately said screw it I want to drive my car. When I bolted the seats in for the first time I sat there to remember how comfy my old S15 was and just sat there for like 20 minutes doing nothing, just looking around the car adjusting the mirror, adjusting the seat and steering wheel as if I was ready to start her. I want her on the road so bad. Late ron when things have settled in I can then think about getting a Koyo rad, and some other items like cam and headgasket and whatnot but for now I wanna drive her and get it tuned as a daily. I am hoping by mid next month she is a daily.

User avatar
swift gti funatic
3NE2NR is my LIFE
Posts: 796
Joined: November 2nd, 2006, 9:12 pm
Location: hitting the apex

Postby swift gti funatic » April 29th, 2010, 2:30 pm

ah ha soo i see where the rb is going :twisted: all the best. hope everything goes smooth :wink:

User avatar
TriniGT
punchin NOS
Posts: 4293
Joined: May 6th, 2003, 12:22 pm
Location: Home Playing DIYer

Postby TriniGT » April 29th, 2010, 2:35 pm

Yeah the RB hopefully once I can get onto Patrick can be swapped onto GTT at some point but not rushing it.

User avatar
legoRB
Riding on 16's
Posts: 1296
Joined: March 28th, 2009, 10:57 pm
Location: Seeking the ultimate kakeyoro.....

Postby legoRB » April 29th, 2010, 7:24 pm

Nice progress.... Cant wait for pics as well....

User avatar
TriniGT
punchin NOS
Posts: 4293
Joined: May 6th, 2003, 12:22 pm
Location: Home Playing DIYer

Postby TriniGT » April 30th, 2010, 12:17 am

Engine is officially out, took two hours, one to remove some of the fine stuff like heater hoses, wires, accessories like power steering, oil relocator and whatnot and an hour to manouvre the flicking engine out with the shifter in tact. On the S15 there is a series of seals that I remembered from my last car gave trouble to get replacements for and when reinstalled they leaked at high rpm bringing the gear oil smell in the car which I do not want this time, I am picky. Riyad yuh real bless me up tonight and helped me remove the engine even though I had called it a night as I could not do the job on my own as was gonna wait until tomorrow to tackle it. Busted open the gearbox to check what it had but looks to be a stock setup, everything looks new but I still have to remove the pressure plate and check the clutch disc condition and decide whether to get an Exedy organic disc with copper filings for the setup. I am never gonna run an ACT setup again as last time I had the car stall on me because of the flywheel/copper disc/pressure all fusing together :shock: , it is a known problem. Going to bed now, one less thign on the list, now just to transfer stuff onto the engine and to the engine bay and swap the engine in and plug up and get my fuel probnlems sorted and I can bounce starter :mrgreen: .

User avatar
TriniGT
punchin NOS
Posts: 4293
Joined: May 6th, 2003, 12:22 pm
Location: Home Playing DIYer

Postby TriniGT » May 3rd, 2010, 8:23 am

Didn't get much done this weekend, swapped over the handbrake setup from the front half as it was in a much better condition, reinstalled the main ABS unit and connected the hardlines and swapped all the plastic clips for the hardlines and clipped it all in. Decided to keep my charcoal canister instead of running my catchcan in its place for now, ran all the appropriate lines from the fuel tank to the front then over to the passenger and then to the canister and then back down the passenger side. Also ran the A/C lines from the the firewall and they are currently awaiting the engine to have them reconnected.

Only thing left to do in the engine bay is to swap over my steering rack from the front hald along with the power steering reservoir. Reason for doing this is that I got beefy upgraded inner ends and they do not allow enough adjustment and cause the entire camber to be off, even with all arms adjusted the camber is off, the only thing left to do would be to adjust the offset of the coilover itself to shift the entire assembly out to help with adjustment. To make things easy I will just swap out the entire steering rack and call it a day. Boost Solenoid and fuel filter brackets and whatnot have all been swapped.

The interior is beginning to look more like a car now, I swapped the front seats in and also ran my power cable from the engine bay to the trunk for the battery relocation so now all I need to do is take that spray supplied by Driftworks and spray the top of my coilovers in the rear and tighten my rear strut bar and run my rear wiper line all the way to the front to the wiper washer tank reservoir. Once that is done I can then fit my rear parcel shelf and button up the two plastics in the back and fit the back seats in.

Only thing at that point missing from the interior is the driver side pillar that I am going to be doing some work on that will be revealed later on. I have decided that I am going to more than likely sell some of my defi setup in an effort to purchase a Defi DIN setup to make things look neat, it will fit below the stereo and will accomodate two temp and one pressure gauge so I will only need a boost, EGT and a wideband all of which I have already. I have already fitted the passenger air bag and driver steering wheel with air bag. I may have the steering up for sale at some point with the boss kit, not sure yet though. The passenger side air bag cover is not fitting properly and pisses me off but I will have to live with it.

Other than that it is a matter of swapping on the Greddy engine sump, Greddy Intake manifold, I will need to get some fittings for it as it came without them. Gonna speak with suppliers and see if I can get both the install kits for the intake mani and the sump as they came without them. Pressure plate is going to be torqued back today and the gearbox refitted to await fitting. Last piece of the puzzle is to get an S15 fuel tank setup, I have the cover but need the entire in-tank setup with the metal rack and hardline, I will be using a walbro so pump is not necessary but need everything else. If anyone has one let me know ASAP please.

User avatar
Picasso
3ne2nr Toppa Toppa
Posts: 5013
Joined: April 28th, 2005, 8:24 am
Location: In a Big Body old car

Postby Picasso » May 3rd, 2010, 9:41 am

TriniGT wrote:Yeah the RB hopefully once I can get onto Patrick can be swapped onto GTT at some point but not rushing it.


This is the same thing I was telling you to do and yuh say nah :lol: :lol: :lol:

User avatar
TriniGT
punchin NOS
Posts: 4293
Joined: May 6th, 2003, 12:22 pm
Location: Home Playing DIYer

Postby TriniGT » May 3rd, 2010, 9:46 am

Well once the silvia working proper the GTT will be down for the count for some much needed love, exterior-wise interior-wise and engine as well.

User avatar
skyline dett
3NE 2NR for life
Posts: 155
Joined: February 3rd, 2007, 1:29 pm
Location: HITING 180 IN MY 180

Postby skyline dett » May 3rd, 2010, 10:34 am

nice build up bro cant wait to see on the road

User avatar
Picasso
3ne2nr Toppa Toppa
Posts: 5013
Joined: April 28th, 2005, 8:24 am
Location: In a Big Body old car

Postby Picasso » May 3rd, 2010, 10:43 am

I keep seeing you around in it all over the place.. Car sounds really nice.. not too long ago I was on the highway and saw you hammering it.. Car running nice man :mrgreen: .

User avatar
TriniGT
punchin NOS
Posts: 4293
Joined: May 6th, 2003, 12:22 pm
Location: Home Playing DIYer

Postby TriniGT » May 3rd, 2010, 12:13 pm

Yeah well everything stock in it only running 7psi. It's a daily so for now staying stock. Ain't see allyuh fellas in a while.

User avatar
skyline dett
3NE 2NR for life
Posts: 155
Joined: February 3rd, 2007, 1:29 pm
Location: HITING 180 IN MY 180

Postby skyline dett » May 4th, 2010, 6:08 am

TriniGT wrote:Yeah well everything stock in it only running 7psi. It's a daily so for now staying stock. Ain't see allyuh fellas in a while.


sounds good u got pics of it

User avatar
TriniGT
punchin NOS
Posts: 4293
Joined: May 6th, 2003, 12:22 pm
Location: Home Playing DIYer

Postby TriniGT » May 4th, 2010, 6:52 am

skyline dett wrote:sounds good u got pics of it


This is the daily, will be taking a transformation soon enough, thinking something like the Mines R34 look.
Image

Advertisement

Return to “The Car Park”

Who is online

Users browsing this forum: sparta888 and 42 guests